Note
You can also watch the video of Beanbird Bot in action.
You can also watch the video of Beanbird Bot in action.
January 27, 2019
Author: Brian Shin

Beanbird Bot
One of the main advantages of the webOS platform lies in its strength in graphical capabilities on low-cost embedded platforms. Combined with the Enact framework, webOS offers a high-performance graphics stack for rendering web applications seamlessly on resource-constrained hardware. In addition to television and signage where webOS has traditionally been used, robotics offers another great application area for such capabilities.
We built the Beanbird robot (“Beanbird Bot”) to demonstrate the capabilities of robotics software running on webOS Open Source Edition (OSE). Beanbird Bot runs Robot Operating System 2 (ROS 2), a robotics middleware, on an inexpensive and accessible hardware platform, the Raspberry Pi 3. It has joystick control and sensors including camera, ultrasound, and range sensors. Furthermore, it displays a range of emotions and reacts to its environment, recognizes objects and displays them on its screen, and makes sounds based on the activity it is engaged in. This is made possible by an Enact-based web application running on the same Raspberry Pi hardware as the robotics platform.
Whether you are thinking of building a relatively inexpensive social robot or building educational robots, this post will show you how to build your own Beanbird robot and leverage the webOS platform for your robotics needs, and detail our development process of creating a robotics software prototype for a specific application by combining webOS OSE and ROS 2.
Beanbird Bot is based off of the popular Duckietown platform first started at MIT and now maintained by the Duckietown Foundation. The basic Duckiebot hardware consists of the chassis, battery, camera, Raspberry Pi, Raspberry Pi motor hat, and motors/wheels. In addition, Beanbird Bot adds a 7 inch Raspberry Pi touchscreen, a touchscreen case, an ultrasonic sensor, a time-of-flight distance sensor, and an Intel Neural Compute Stick for running deep learning models for image classification.

Joystick controller used to control the robot

Ultrasound and range sensor

A fully assembled Beanbird Bot
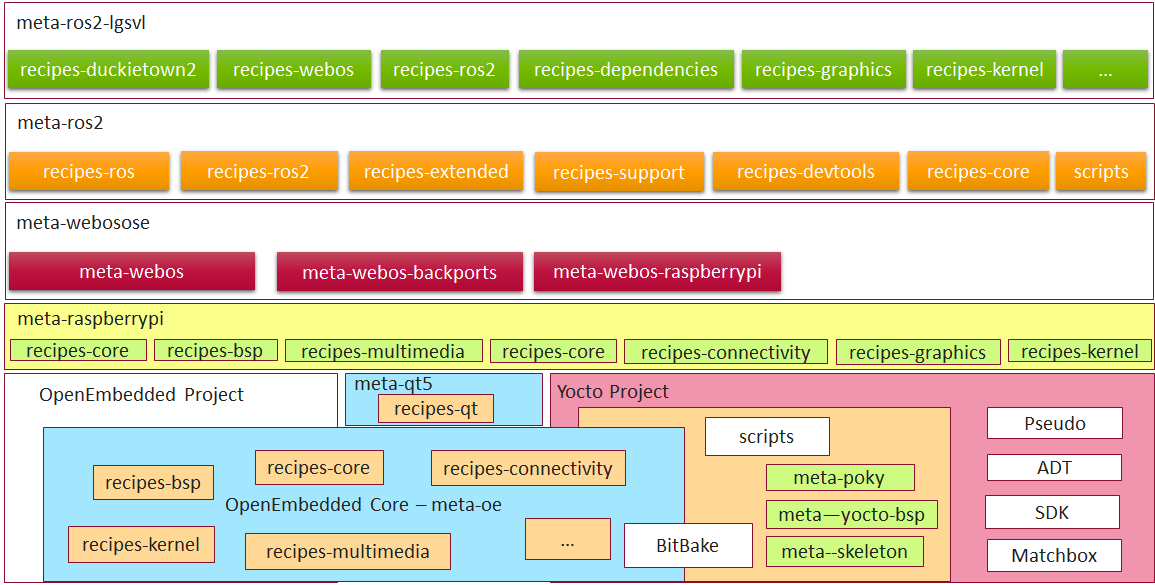
The Yocto layer of Beanbird Bot
Our work builds on open source contributions to the Yocto layer meta-ros. Continuing from an existing ROS 2 pull request, we updated ROS 2 Bitbake recipes (ament, ros2 core packages), added missing core packages, and fixed dependencies.
We first upgraded the meta-ros2 layer to the latest release of ROS 2 (Ardent). We added Bitbake recipes to build components necessary for running ROS 2 itself efficiently on a Raspberry Pi, including python3-opencv, boost, an ament tool for python. Then, by taking the existing Yocto meta-layer for webOS, we added several components needed for hardware support, including touchscreen, I2C and GPIO, and joystick. We also added specific ROS 2 core packages that were needed for our use case, including parts of the vision_opencv suite (cv_bridge and image_geometry) as well as support for the Intel Movidius SDK to communicate with the Intel Neural Compute Stick. By including only components needed for the robot’s desired functionality, the system image itself avoids unnecessary overhead and maintains a small footprint.
The result is a fully buildable webOS distribution for the Raspberry Pi 3 capable of running ROS 2 nodes as well as visual applications. Anyone can now add a Yocto layer with recipes for their own ROS 2 packages.
Our Beanbird robot is based on the Duckietown project originally started at MIT and is capable of joystick control, object recognition through the Raspberry-Pi camera, visual reaction (facial expressions and sounds) and obstacle avoidance via integration of ultrasonic and IR proximity sensors. We integrate ROS 2, which drives the perception, movement, and object recognition, with webOS, which drives the main web application UI that interacts with the surrounding environment.
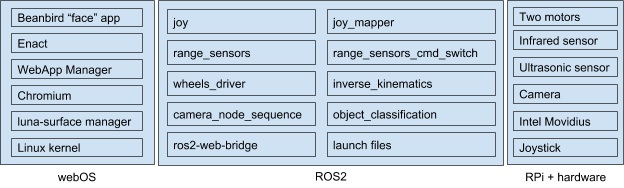
Core system components driving Beanbird Bot
We use the ros2-web-bridge project to allow web applications to communicate with ROS 2 nodes. Ros2-web-bridge allows to access ROS 2 topics from applications or frameworks which don’t have or cannot have ROS 2 native bindings. Instead it implements custom JSON-based protocol over websocket. When webapp pushes a new message to websocket, the ros2-web-bridge receives it, converts to ROS 2 native message and publishes it to other ROS 2 nodes. Bridge also maintains the list of subscribed topics and notifies websocket client about published messages from other ROS 2 nodes.
One disadvantage of ros2-web-bridge is that it is not suitable for large amounts of data, such as images, as it introduces significant delay. Thus we extended ROS 2 camera node to serve raw image data (jpeg) over plain HTTP server. Enact web applications can then easily access this HTTP endpoint.
To create the UI for the robot, we used Enact, a React-based application framework. The first step was to create the project. We used Enact’s CLI tool to create the skeleton and then we used npm to install the roslib library. We did not need to do any additional setup for the configuration of our development environment because Enact handled it all.
The second step was to begin coding the application. Because webOS allows us to use web technologies for native applications, we were able to quickly iterate on the app itself. Enact’s ‘serve’ feature updated the application with code changes in real time without having to stop, rebuild, and redeploy. Additionally, we could develop using the debugging features of desktop browsers and switch to the robot seamlessly.

The Face Application UI with touchscreen controls
The application itself consists of two parts. The first part is the expressive face. To produce the face, a set of combinable behaviors was defined. The behaviors control the rendering of facial elements and can combine to produce hundreds of unique expressions. The second part is the interface to ROS. We subscribed to the ROS topics we were interested in, which were mapped to facial expressions that we assigned in the configuration files. This, for example, allows us to match the object identification system to specific facial expressions and optional sounds.
The final step, once the application was complete, was to package it for deployment. We created an optimized production build of the application and packaged it using webOS tools. This was then installed onto the robot and configured to start when the robot powers on.
The source code is available on Github. As mentioned, the application can be served locally (follow the directions in the README.md file). If a connection to the robot cannot be established, mock data will be used automatically. Clicking on the robot face will bring up an ‘expression console’ for testing different combinations of expressions.

The web app enables dynamic facial expressions, animations, and features
There are several directions to take as next steps for a robot like Beanbird Bot. One example is more autonomous behavior, such as lane following, localization, and navigation around a map. Furthermore, a developer could leverage the flexible web UI framework to build a robot that can interact with humans, allow video calls, or stream content for education or entertainment.

A lane-following Beanbird Bot
webOS OSE is a lightweight but powerful embedded Linux distribution that is worth thinking about for a robotics application. With the Enact framework, it is especially powerful for creating fully-featured and beautiful user-facing web applications that can communicate directly with the underlying robotics software. It is easy to get started, and all of the documentation is readily available for you to try directly.

Build one yourself!
Contents