Q: I installed webOS OSE on my Raspberry Pi and want to make a web app that can control the GPIOs of the device. Is there a service for that? A: Unfortunately, no. There is no service available on webOS OSE to control the GPIOs.
Q: Hmm, then, is it possible to create a native service for controlling the GPIOs by myself? A: Yes. You can create a native service that can access and control the GPIOs using the library named wiringPi.
Q: I’ve searched the latest image of webOS OSE for the wiringPi library, but I couldn’t find it. What should I do? A: Here’s a guide for you on how to add the wiringPi library to webOS OSE.
As mentioned in the Q&A above, there is no GPIO service available on webOS OSE at the moment, but you can create one capable of controlling the GPIOs using the wiringPi library. It was demonstrated in the service (https://github.com/webosce/com.webos.service.rpi.gpio) developed by Jun-ho Ryu at the last year’s contributhon (a portmanteau of “contribution” and “marathon”). However, even if you decide to try writing a native service on your own, you will realize the wiringPi library is not found. You have to add it first.
You can either include the library when building the webOS OSE image or, if you already have the built webOS OSE image, build the library separately and install it on webOS OSE.
Caution The GPIO service in the webOS Community Edition (webosce) mentioned above includes errors, so it is recommended that you create a service by yourself or modify the errors before using it.
Including the wiringPi library when building a webOS OSE image
First, let me explain how to add the wiringPi library when building a webOS OSE image.
About the requirements for a build environment, refer to System Requirements.
Clone build-webos in the host PC and install required tools.
MyLinux:~$ mkdir ose; cd ose
MyLinux:~/ose$ git clone https://github.com/webosose/build-webos.git
MyLinux:~/ose$ cd build-webos
MyLinux:~/ose/build-webos$ sudo scripts/prerequisites.sh
Configure the build environment and get the metalayer source.
When the build is done, flash webos-image-raspberrypi3.rootfs.rpi-sdimg to the SD card. (Refer to Flashing webOS OSE.)
Type the gpio command to test. If the result is shown as in the following, the installation is successful.
root@raspberrypi3:~# gpio
gpio: At your service!
  Type: gpio -h for full details and
        gpio readall for a quick printout of your connector details
root@raspberrypi3:~#
Building only the wiringPi library and installing it onto webOS OSE
If you already have a built webOS OSE image, you don’t have to build the entire image again. Build only the wiringPi library and install it onto webOS OSE.
Clone build-webos on the host PC and install required tools.
MyLinux:~$ mkdir ose; cd ose
MyLinux:~/ose$ git clone https://github.com/webosose/build-webos.git
MyLinux:~/ose$ cd build-webos
MyLinux:~/ose/build-webos$ sudo scripts/prerequisites.sh
Configure the build environment and get the metalayer source.
If there is an already installed package, you will see an error message as below.
For example, if the wiringpi package is already installed:
Collected errors:
* opkg_prepare_file_for_install: Refusing to load file 'wiringpi_git-r0_raspberrypi3.ipk' as it matches the installed version of wiringpi (git-r0).
Type the gpio command to test. If the result is shown as in the following, the installation is successful.
root@raspberrypi3:~# gpio
gpio: At your service!
  Type: gpio -h for full details and
        gpio readall for a quick printout of your connector details
root@raspberrypi3:~#
Before using GPIOs in your app
Now you have the wiringPi library installed on webOS OSE. In the following article which will come soon, you will learn how to actually control the GPIOs on webOS OSE.
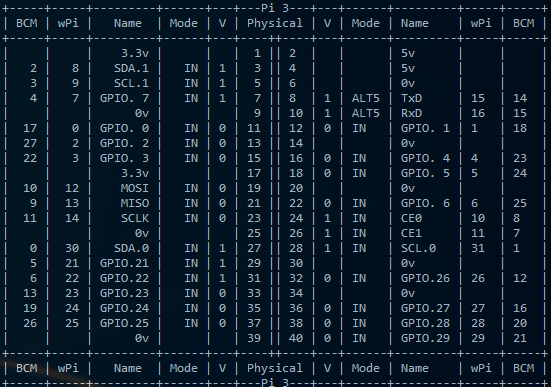
As the GPIO pin arrangement of the Raspberry Pi is different from that of wiringPi, you have to check the mapping table before specifying a pin number. To see the pin mapping table between the Raspberry Pi and wiringPi, type the gpio readall command on the console.
The screenshot below is the pin mapping table, where the Physical columns at the center show the physical pin arrangement of Raspberry Pi and the wPi columns on the left and right denote the mapped pin number of wiringPi.