Tutorial - Jetson Nano

This guide describes how to bring up an NVIDIA Jetson Nano board to run webOS OSE.

Deprecation Notice
This guide had been tested with webOS OSE 2.18.0. We do not guarantee the validity of this guide on the latest webOS OSE.

Prerequisites

  • NVIDIA Jetson Nano Developer Kit and a power supply for the kit

  • A MicroSD card (8 GB or larger) and MicroSD card reader

  • A computer using Linux distribution

  • An Ethernet cable and internet connection

  • A USB to TTL serial cable

    Note
    In this guide, we use a 4-pin TTL serial cable. The commands and steps in the guide might be changed depending on the type of your cable.
  • (Optional) Input devices such as a keyboard and a mouse

  • (Optional) HDMI-compatible monitor and cable

See also Build System Requirements and Host Machine Requirements.

Terminologies

Build System
A computer that build an image from webOS OSE source code. In this guide, we will use a Linux machine for the build system.
Host Machine
A computer to flash the built image. The build system can be used as a host machine.
Target Device
A device that runs webOS OSE. In this guide, the target device is NVIDIA Jetson Nano.

Updating the Firmware

Before you start to bring up a Jetson Nano board, you need to update the firmware of the board to the latest version.

  1. Download the official Jetson Nano Developer Kit SD Card Image.
  2. Flash the image to a MicroSD card.
  3. Insert the MicroSD card to your Jetson Nano board and connect the power supply. Then the board powers on and the firmware is automatically updated (Internet connection required).

For more information about getting started with Jetson Nano Developer Kit, check the official guide on the NVIDIA developer website.

Building the Image

Building a webOS OSE image for Jetson Nano is done in much the same way as building an image for Raspberry Pi. By modifying few steps to the existing guide, you can build the image for the Jetson Nano board.

Note
webOS OSE’s build system is based on Yocto Project. For more details on the Yocto Project, visit the official website.

Cloning the Source Code

You can clone the webOS OSE’s source code with the following command:

$ git clone https://github.com/webosose/build-webos.git

Then move into the build-webos directory.

$ cd build-webos

Installing the Required Tools and Libraries

Before you build webOS OSE, you need to install the required tools and libraries first. If you try to build without them, BitBake will fail a sanity check and tell you what’s missing, but not really how to get the missing pieces. On Ubuntu, you can force all of the missing pieces to be installed with the following command:

$ sudo scripts/prerequisites.sh

Adding the Target Device

To build an image for Jetson Nano, add jetson-nano-devkit to build-webos/weboslayer.py. This will be used in the Configuring the Build section.

build-webos/weboslayer.py
Distribution = "webos"

# Supported MACHINE-s
# Add 'jetson-nano-devkit' to the list
Machines = ['qemux86', 'qemux86-64', 'qemuarm', 'raspberrypi3', 'raspberrypi3-64', 'raspberrypi4', 'raspberrypi4-64', 'jetson-nano-devkit']

# github.com/openembedded repositories are read-only mirrors of the authoritative
# repositories on git.openembedded.org
Note
jetson-nano-devkit is one of the example target devices. For more information about supported NVIDIA boards, see Appendix.

Adding the meta-tegra Repository

meta-tegra is a BSP (Board Support Packages) layer for the NVIDIA Jetson platforms. The BSP layer provides board specific information such as machine configuration files and recipes. If you want to learn more about BSP layer and Yocto project, see the official document.

To add the repository, add the following codes to build-webos/weboslayer.py:

('meta-tegra',                30, 'https://github.com/OE4T/meta-tegra.git',                 'branch=dunfell-l4t-r32.6.1', ''),

Make sure that you add the above code in ascending order. In the following example code, note the order of the number:

Example of build-webos/weboslayer.py
...
webos_layers = [
...

('meta-qt6',                  20, 'https://code.qt.io/yocto/meta-qt6.git',                  'branch=6.3.0,commit=f7c9337', ''),
                              
('meta-tegra',                30, 'https://github.com/OE4T/meta-tegra.git',                 'branch=dunfell-l4t-r32.6.1', ''),
 
('meta-webos-backports-3.2',  33, 'git://github.com/webosose/meta-webosose',                '', ''),
('meta-webos-backports-3.4',  35, 'git://github.com/webosose/meta-webosose',                '', ''),

...
]

Configuring the Build

To configure the build for the target device and to fetch the sources, run the following command:

$ ./mcf -p A_HALF_NUMBER_OF_PHYSICAL_CPU_CORES -b A_HALF_NUMBER_OF_PHYSICAL_CPU_CORES jetson-nano-devkit

We highly recommend to use the value less than half of the number of physical CPU cores. If you specify a number higher than that, it might cause unexpected errors during the build. For more information about how to set the option values, see How to Find the Optimum Parallelism Values.

The mcf command creates a file to initialize the build environment.

Note
If you want to use another NVIDIA Jetson board, you need to replace the target device name (jetson-nano-devkit) with that of other NVIDIA machines. See Appendix for supported NVIDIA machines and their target device name.

Setting Up Configurations

Before you build the source code, you need to modify Yocto configuration files.

First initialize the build environment:

$ source oe-init-build-env

layer.conf

Copy and paste the following codes at the end of build-webos/meta-webosose/meta-webos/conf/layer.conf:

build-webos/meta-webosose/meta-webos/conf/layer.conf
# Add meta-tegra layer information.
# IMAGE_CLASSES and IMAGE_FSTYPES is used to flash the target device.
IMAGE_CLASSES += "image_types_tegra"
IMAGE_FSTYPES = "tegraflash tar.gz.bz2"
IMAGE_TYPES += "tegraflash"
 
# The default value for IMAGE_NAME_SUFFIX occurs an error when you build webOS OSE with u-boot.
# To avoid this error, set IMAGE_NAME_SUFFIX as blank.
IMAGE_NAME_SUFFIX = ""
 
# Disable SOTA (Software-Over-the-Air) features.
# SOTA features are not supported in NVIDIA devices.
INHERIT_remove = "sota"
DISTRO_FEATURES_remove = "sota usrmerge"
DISTRO_FEATURES_NATIVE_remove = "sota"
 
# Set rootfs for Jetson Nano.
# mmcblk0p1 is root in Jetson Nano development module for MicroSD card.
KERNEL_ROOTSPEC = "root=/dev/mmcblk0p1 rw rootwait"
  
# Fix bash runtime dependency with respect to WEBOS_PREFERRED_PROVIDER_FOR_BASH
VIRTUAL-RUNTIME_bash ?= "bash"
RDEPENDS_tegra-nvs-base_append_class-target = " ${VIRTUAL-RUNTIME_bash}"
RDEPENDS_tegra-nvs-base_remove_class-target = "${@oe.utils.conditional('WEBOS_PREFERRED_PROVIDER_FOR_BASH', 'busybox', 'bash', '', d)}"
RDEPENDS_tegra-nvphs-base_append_class-target = " ${VIRTUAL-RUNTIME_bash}"
RDEPENDS_tegra-nvphs-base_remove_class-target = "${@oe.utils.conditional('WEBOS_PREFERRED_PROVIDER_FOR_BASH', 'busybox', 'bash', '', d)}"
RDEPENDS_tegra-configs-nvstartup_append_class-target = " ${VIRTUAL-RUNTIME_bash}"
RDEPENDS_tegra-configs-nvstartup_remove_class-target = "${@oe.utils.conditional('WEBOS_PREFERRED_PROVIDER_FOR_BASH', 'busybox', 'bash', '', d)}"
  
# Disable com.webos.app.volume, com.webos.app.notification, and g-media-pipeline
# These applications are not guaranteed to work properly on NVIDIA devices.
VIRTUAL-RUNTIME_com.webos.app.notification = ""
VIRTUAL-RUNTIME_com.webos.app.volume = ""
VIRTUAL-RUNTIME_g-media-pipeline = ""

meta-tegra

In build-webos/meta-tegra/recipes-bsp/u-boot/u-boot-tegra_2020.04.bb, add and remove commands as follows:

build-webos/meta-tegra/recipes-bsp/u-boot/u-boot-tegra_2020.04.bb
...

DEPENDS += "bc-native dtc-native ${SOC_FAMILY}-flashtools-native"
+LICENSE = "CLOSED" # Add this line
SRC_REPO ?= "github.com/OE4T/u-boot-tegra.git;protocol=https"
SRC_URI = "git://${SRC_REPO};branch=${SRCBRANCH}"

...

require u-boot-tegra-bootimg.inc
 
-PACKAGES =+ "${PN}-extlinux" # Remove this line
FILES_${PN}-extlinux = "/boot/extlinux /boot/initrd"
ALLOW_EMPTY_${PN}-extlinux = "1"
RPROVIDES_${PN}-extlinux += "u-boot-extlinux"

...
Note
Throughout this document, - means deleting the line and + means adding the line.

qtbase_git.bbappend

In meta-webosose/meta-webos/recipes-qt/qt6/qtbase_git.bbappend, remove a line regarding to “eglfs-egldevice”.

meta-webosose/meta-webos/recipes-qt/qt6/qtbase_git.bbappend
PACKAGECONFIG[sessionmanager] = "-DFEATURE_sessionmanager=ON,-DFEATURE_sessionmanager=OFF"
PACKAGECONFIG:remove = "sessionmanager"
 
PACKAGECONFIG[xlib] = "-DFEATURE_xlib=ON,-DFEATURE_xlib=OFF"
PACKAGECONFIG:remove = "xlib"
 
PACKAGECONFIG[eglfs-egldevice] = "-DFEATURE_eglfs_egldevice=ON,-DFEATURE_eglfs_egldevice=OFF"
-PACKAGECONFIG:remove = "eglfs-egldevice" # Remove this line
 
 
PACKAGECONFIG[system-sqlite] = "-DFEATURE_system_sqlite=ON,-DFEATURE_system_sqlite=OFF"
PACKAGECONFIG:append = " system-sqlite"
 
PACKAGECONFIG[system-pcre2] = "-DFEATURE_system_pcre2=ON,-DFEATU

Adding compatibility for Qt6

  1. Create an directory as follows:

    mkdir -p build-webos/meta-tegra/recipes-qt/qt6
    
  2. Move to the build-webos/meta-tegra directory and cherry-pick the following two commits:

    (build-webos/meta-tegra)$ git cherry-pick 47b14268ef9aaccf57604e1665612faa239c2223
    (build-webos/meta-tegra)$ git cherry-pick f30f4cf1e9edc2eb47b76dfa07cd1be8947a98df
    
  3. Cherry-picking generates files in build-webos/meta-tegra/external/qt5-layer/recipes-qt/qt5. Move the files to the directory created in the step 2.

    mv build-webos/meta-tegra/external/qt5-layer/recipes-qt/qt5/* build-webos/meta-tegra/recipes-qt/qt6
    
    # Check the result
    tree build-webos/meta-tegra/recipes-qt/qt6
    
    build-webos/meta-tegra/recipes-qt/qt6
    ├── qtbase
    │   ├── 0001-eglfs-Newer-Nvidia-libdrm-provide-device-instead-dri.patch
    │   └── 0002-eglfs-add-a-default-framebuffer-to-NVIDIA-eglstreams.patch
    └── qtbase_%.bbappend
    
    1 directory, 3 files
    
  4. Then remove the empty directory.

    rm -rf build-webos/meta-tegra/external/qt5-layer
    
  5. In build-webos/meta-tegra/recipes-qt/qt6/qtbase_%.bbappend, add following two lines:

    FILESEXTRAPATHS:prepend := "${THISDIR}/${PN}:"
    
    SRC_URI += "file://0001-eglfs-Newer-Nvidia-libdrm-provide-device-instead-dri.patch \
                file://0002-eglfs-add-a-default-framebuffer-to-NVIDIA-eglstreams.patch \
    "
    
    PACKAGECONFIG:append:tegra = " kms"
    +PACKAGECONFIG:append:tegra = " gbm eglfs-egldevice"
    +DISTRO_FEATURES:remove = "ptest"
    
  6. In build-webos/meta-tegra/recipes-qt/qt6, create the following files:

    • qtdeclarative_%.bbappend
    • qtgraphicaleffects_%.bbappend
    • qtshadertools_%.bbappend
    • qtwayland_%.bbappend
    touch build-webos/meta-tegra/recipes-qt/qt6/qt{declarative,graphicaleffects,shadertools,wayland}_%.bbappend
    
  7. Add a line, DISTRO_FEATURES:remove = "ptest", to each file created in the step 6.

Building the webOS OSE Image

To start the build process, run the following command:

(build-webos)$ source ./oe-init-build-env
(build-webos)$ bitbake webos-image

Flashing the Image

If the build succeeds, you can find the built webOS OSE image at the BUILD/deploy/images/<TARGET DEVICE NAME> directory. Move to the directory.

$ cd build-webos/BUILD/deploy/images/jetson-nano-devkit
  1. Create an image for MicroSD card.

    $ mkdir jetson-nano-image
    $ tar -zxvf webos-image-jetson-nano-devkit.tegraflash.tar.gz -C ./jetson-nano-image
    $ cd jetson-nano-image
    $ ./dosdcard.sh
    
  2. Insert your MicroSD card into your PC and flash the created image to your microSD card.

    $ sudo umount /dev/sd<xN>
    $ sudo dd if=./webos-image.sdcard of=/dev/sd<x> bs=10M
    $ sync
    $ sudo umount /dev/sd<xN>
    
    • sd<xN> denotes the device name of the MicroSD card, where x is a character and N is a number suffix.
    • For dd command, you must pass sd<x> (x is the same as the x in the above) to the of operand. sd<X> indicates the mass storage device, not the partition.

If the flashing succeeds, remove the MicroSD card from the PC and insert the card into your target device.

Configuring Extra Setup

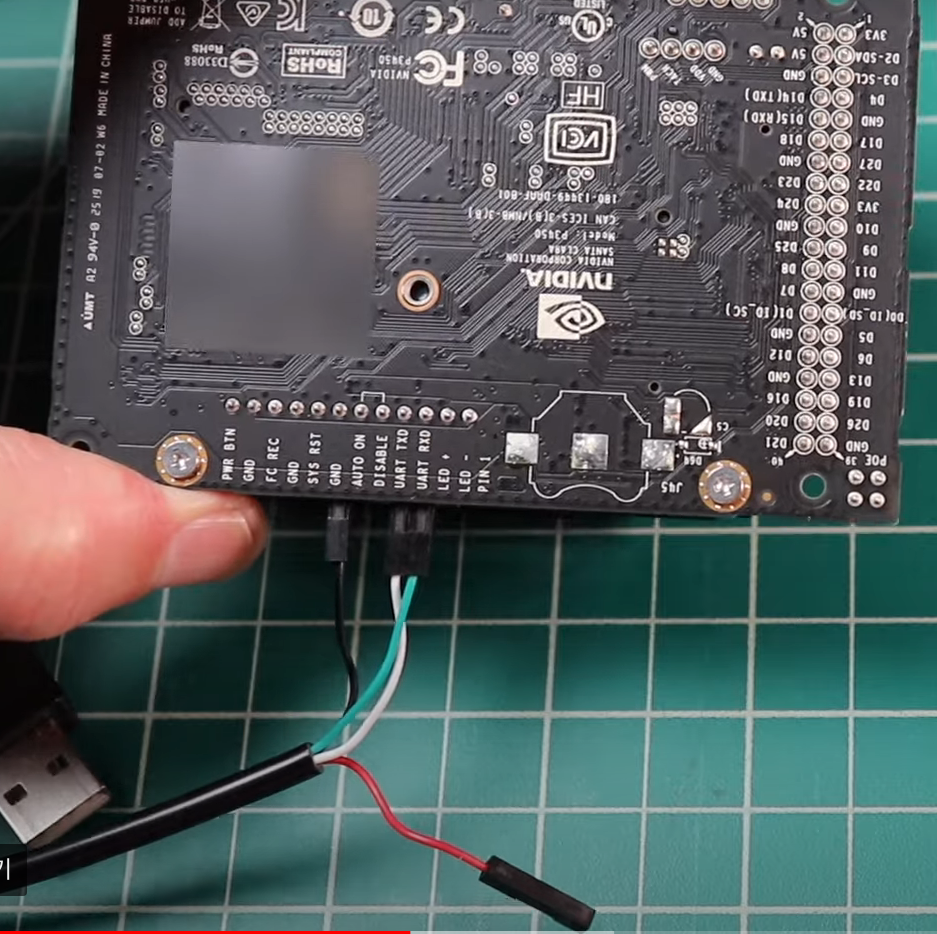
At this moment, if you turn on the target device, none of the peripheral devices (touch display, keyboard, and mouse) are work. To use the peripheral devices and other useful features, you need to set up extra configurations.

Establishing a Serial Connection

Since you cannot use keyboard on the target board yet, you have to establish a serial connection between the host machine and the target device.

Using the USB to TTL serial cable, connect the host machine and the target device.

Serial cable wiring in Jetson Nano board

Jetson Nano

Serial cable color

GND

Black

UART TXD

White

UART RXD

Green

Then set up the serial connection by following the Set Up a Serial Terminal guide.

Once you set up a serial connection successfully, connect to the target device and modify the files specified in the subsequent sections.

Enabling Graphic Interfaces

Modify /etc/surface-manager.d/product.env as follows:

/etc/surface-manager.d/product.env
# Platform plugin to be used
export WEBOS_COMPOSITOR_PLATFORM="eglfs_webos"
- export QT_QPA_EGLFS_INTEGRATION="eglfs_kms_webos"
+ export QT_QPA_EGLFS_INTEGRATION="eglfs_kms_egldevice"
 
# Disable to set the WEBOS_COMPOSITOR_DISPLAY_CONFIG value. Get the value from configd.                   
- WEBOS_COMPOSITOR_DISPLAY_CONFIG=$(luna-send -n 1 -a com.webos.surfacemanager luna://com.webos.service.config/getConfigs '{"configNames":["com.webos.surfacemanager.displayConfig"]}' | grep -oE "\[\{.*\}\]
+ #WEBOS_COMPOSITOR_DISPLAY_CONFIG=$(luna-send -n 1 -a com.webos.surfacemanager luna://com.webos.service.config/getConfigs '{"configNames":["com.webos.surfacemanager.displayConfig"]}' | grep -oE "\[\{.*\}\]
  • Replace the value of QT_QPA_EGLFS_INTEGRATION into eglfs_kms_egldevice.
  • Delete the line for WEBOS_COMPOSITOR_DISPLAY_CONFIG. This change makes WEBOS_COMPOSITOR_DISPLAY_CONFIG get its value from configd.
Note
In the above code, - means deleting the line and + means adding the line.

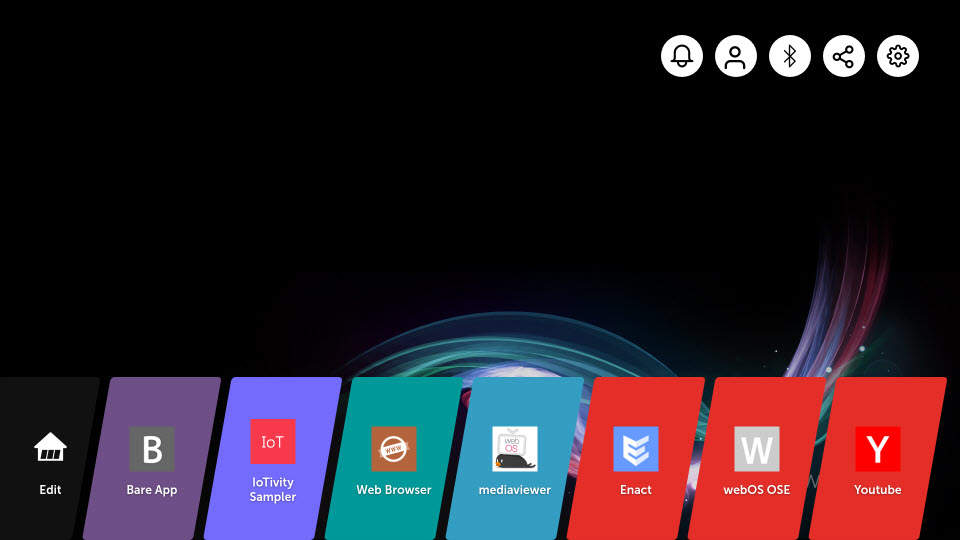
After modifying the /etc/surface-manager.d/product.env file, you have to reboot Home Launcher and the target device.

$ root@jetson-nano-devkit:~# restart surface-manager
restart surface-manager
$ root@jetson-nano-devkit:~# restart bootd
restart bootd

Enabling Touch Display and Keyboard

You need to install necessary plugins for the touch display and the keyboard devices. Modify /usr/bin/surface-manager.sh as follows:

/usr/bin/surface-manager.sh
pmlog info "Starting /usr/bin/surface-manager with flags -platform ${WEBOS_COMPOSITOR_PLATFORM} ..."
- exec /usr/bin/surface-manager -platform ${WEBOS_COMPOSITOR_PLATFORM}
+ exec /usr/bin/surface-manager -platform ${WEBOS_COMPOSITOR_PLATFORM} -plugin evdevtouch:/dev/input/event3 -plugin evdevkeyboard

After modifying the /usr/bin/surface-manager.sh file, you have to reboot Home Launcher and the target device.

$ root@jetson-nano-devkit:~# restart surface-manager
restart surface-manager
$ root@jetson-nano-devkit:~# restart bootd
restart bootd

Verifying the Image

If you see the following screen on your monitor, you have successfully brought up your board on webOS OSE.

Initial screen of webOS OSE

Appendix

You can use webOS OSE on other NVIDIA machines. The following table shows the target device name for each NVIDIA machine.

NVIDIA Machine

Target Device Name

Jetson TX1

jetson-tx1-devkit*

Jetson TX2

jetson-tx2-devkit

jetson-tx2-devkit-4gb*

Jetson Nano

jetson-nano-devkit

jetson-nano-devkit-emmc*

jetson-nano-2gb-devkit*

Jetson AGX Xavier

jetson-agx-xavier-devkit

jetson-agx-xavier-devkit-8gb*

* : This machine is not tested on webOS OSE.

Contents