Note Building webOS OSE image requires Ubuntu and significant computing resources (See Appendix B. Build Time Test). If building the image locally is not feasible, consider using pre-built images.
Quick Summary
Here is a quick summary for users already familiar with building webOS OSE. If you are new to webOS OSE, we recommend reading the whole document thoroughly.
# Download source codes$ git clone https://github.com/webosose/build-webos.git
$ cd build-webos
# Install and configure the build$ sudo scripts/prerequisites.sh
$ ./mcf -p <half the num of CPUs> -b <half the num of CPUs> <image type>
# Start to build$ source oe-init-build-env
$ bitbake webos-image
Note If you have any problem during the build process, please check the Troubleshooting Guide section.
$ git clone https://github.com/webosose/build-webos.git
$ cd build-webos
(Optional) How to Handle Patch Versions
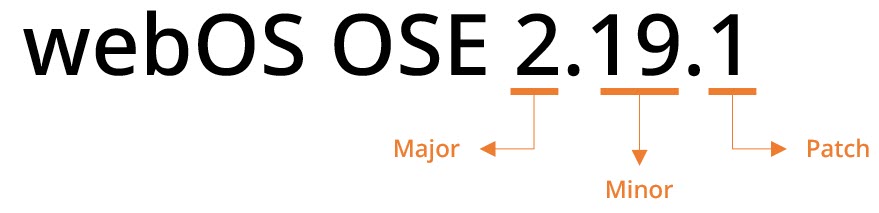
Since webOS OSE consists of many open-source projects, changes in those projects can sometimes cause unexpected build-time errors. To address this issue, we introduced a new branch policy starting with the webOS OSE 2.19.1 release. This new policy enables the platform to quickly adapt to critical changes.
All you need to do is to check the patch number of the latest version.
If the patch number is not zero, switch to the designated branch before starting the build.
Otherwise, use the master branch.
# If the patch number of the latest version is not 0, checkout to the latest branch# else, use the master branch# Example) If the latest version is 2.19.1 (non-zero patch number)$ git checkout 2.19.1
Versioning rule of webOS OSE
Installing the Required Tools and Libraries
During the building process, BitBake might fail a sanity check. Although BitBake tells you what is missing, it doesn’t install the missing tools and libraries.
You can force to install all of the missing software by entering the following:
$ sudo scripts/prerequisites.sh
Configuring the Build
Using the mcf command, you can set up the followings:
The Type of webOS OSE image to build
The number of logical CPU cores to allocate to the build process
$ ./mcf -p <num of CPUs> -b <num of CPUs> <image type>
Property
Description
<num of CPUs>
This number determines how many CPU cores are allocated for the building process. We recommend using 50 to 70% of the total logical CPU cores. See Appendix A. Setting Values for mcf.
<image type>
A type of the webOS OSE image. Available values are as follows:
raspberrypi4: 32-bit image for webOS OSE 2.0.0 or higher
raspberrypi4-64: 64-bit image for webOS OSE 2.0.0 or higher
raspberrypi3: 32-bit image for webOS OSE 1.x version
raspberrypi3-64: 64-bit image for webOS OSE 1.x version
qemux86: 32-bit image for webOS OSE emulator
qemux86-64: 64-bit image for webOS OSE emulator (For webOS OSE 2.14.0 or higher)
Caution Previous versions of webOS OSE might occur errors during build time. We only guarantee the build of the latest version.
Building the Image
webOS OSE provides two types of images:
webos-image: A standard webOS OSE image
webos-image-devel: A webOS OSE image with various development tools such as GDB and strace (system call tracer)
Building webos-image
IMPORTANT NOTICE This process takes a very long time, especially on laptop computers. Make sure you have enough time and system resources to build. Regarding the build time, refer to Appendix B. Build Time Test.
To kick off a full build of webOS OSE, enter the following:
If the built image exists, move on to the Next Steps.
Cleaning
To blow away the build artifacts and prepare to do the clean build, you can remove the build directory and recreate it by typing:
$ rm -rf BUILD
$ ./mcf.status
This retains the caches of the downloaded source (under build-webos/downloads) and shared state (under build-webos/sstate-cache). These caches will save you a tremendous amount of time during development as they facilitate incremental builds, but these also can cause seemingly inexplicable behavior when corrupted.
webOS OSE fetches (downloads) many external modules during the build process. And these fetch jobs might fail occasionally.
In such case, try cloning the failed module manually. If the cloning succeeds, rerun the bitbake command to continue the build.
# Try cloning the failed module$ git clone <fetch error module>
# If the cloning succeeds, rerun the build process$ bitbake webos-image
Building Multiple Images On The Same Shell
If you try to build two (or more) different webOS OSE images on the same shell, this might cause a build error. To avoid such an error, do one of the following:
If you built the image for Raspberry Pi 4 or Raspberry Pi 3, it’s time to flash the image to the target device. See Flashing webOS OSE.
If you built the image for the emulator, refer to the Emulator User Guide to set up and use the emulator.
Appendix A. Setting Values for mcf
-p and -b options in mcf script are BitBake parallelism values, and those determine how many CPU cores are allocated for the building process.
Too many allocation for the parallelism values might cause build-time error. The recommended value is 50 to 70% of the toal logical CPU cores. To get the number of your computer, enter the following command:
# Get the number of logical CPU cores$ cat /proc/cpuinfo | grep '^processor' | wc -l
Caution Omitting -p and -b options are equivalent to using -p 0 -b 0, which forces the build to use all CPU cores. This might cause unexpected behaviors or a build failure.