This guide describes how to set up the network between the host machine and the target device for webOS IoT.
Before You Begin
Make sure you have prepared the following:
Target device with webOS IoT image
USB to TTL serial cable
Note In this guide, we use the 4-pin TTL serial cable. The commands and steps in the guide might be changed depending on your cable.
Setting Up Serial Connection
To set up the network on the target device, first you need to set up a serial connection between the host machine and the target device.
Connect with the Cable
Connect the host machine with the target device using the USB to TTL serial cable.
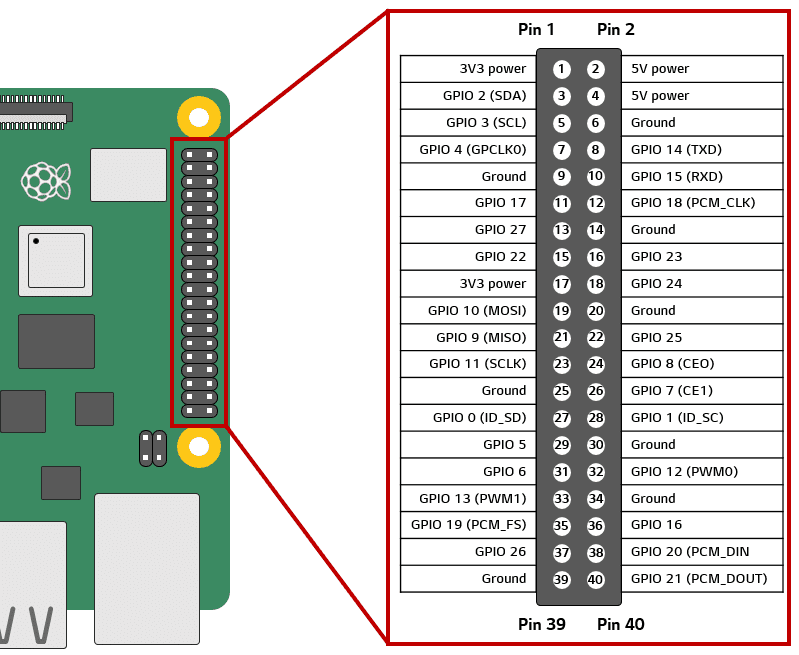
Connect pin sockets to RPi’s GPIO pins as follows:
Type
TTL serial cable color
RPi pin number
Ground
Black
6 - Ground
Data
White
8 - GPIO 14 (TXD)
Data
Green
10 - GPIO 15 (RXD)
Pin Map of Raspberry Pi 4
Connect USB port of the cable to your host machine.
(Optional) Set Up the USB Driver
Basically, a driver for the cable is already included in Linux kernel. But if your host machine cannot recognize the cable, follow the steps below to set up the driver manually:
Check the USB device information.
$ lsusb
Bus 003 Device 051: ID <Vendor>:<Product> Prolific Technology, Inc. PL2303 Serial Port
Enable the device using <Vendor> and <Product> from step 1.
Follow the steps below to set up a serial terminal. Make sure that the target device is turned off beforehand.
Install PuTTY on the host machine.
$ sudo apt update
$ sudo apt install putty
Check the name of the USB device.
$ dmesg | grep tty
[ 6198.188883] usb 3-1: pl2303 converter now attached to ttyUSB<X>
In the above code, typically, <X> is the integer number.
Check that tty device is set successfully.
$ ls /dev/ttyUSB<X> # Use <X> from step 2/dev/ttyUSB<X>
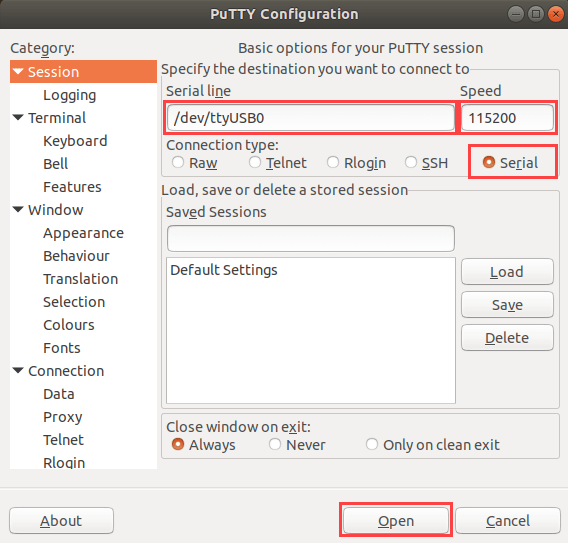
Open PuTTY and enter the following information.
$ sudo putty
Connection Type: Serial
Serial line: /dev/ttyUSB<X>
Speed: 115200
PuTTY Configuration for Serial Connection
Click Open. An empty PuTTY terminal will be opened.
Turn on the target device, then a bunch of debug logs are generated on the PuTTY terminal. After some time, no more logs will be generated. Press Enter.
# After some logs...[ 15.611414] Bluetooth: RFCOMM TTY layer initialized
[ 15.616662] Bluetooth: RFCOMM socket layer initialized
[ 15.622145] Bluetooth: RFCOMM ver 1.11 # Loading complete! Press Enter
Enter the account information to log in. The default account information is as follows. (ID: root, password: none)
# After pressing the enter key in step 6webOS OSE 1.0.g raspberrypi4 ttyS0
raspberrypi4 login: root
Then the terminal of your target device will show up. Now you are ready to access the target device using the serial terminal.
root@raspberrypi4:/sysroot/home/root#
Note
In case you want to use another program (such as Minicom) to make the serial connection, refer to the following table for UART communication:
Properties
Value
Baudrate
115200
Data bits
8
Stop bits
1
Parity
None
Flow Control
Hardware flow control: OFF
Software flow control: OFF
Configuring the Target Device
If you finished setting up the serial connection, it’s time to configure the network information on the target device.
Note The default setting of the webOS OSE is to use Dynamic Host Configuration Protocol (DHCP) and set the network information automatically. Depending on your environment, however, you may need to check if the automatic configuration has been performed correctly. Otherwise, you will need to configure the network information manually.
Follow the steps below to configure the network information on the target device. Make sure that the Ethernet cable is connected beforehand.
To set the manual network, type the following command on the serial terminal:
# Set IPv4 connectionroot@raspberrypi4:/sysroot/home/root# luna-send -n 1 -f luna://com.webos.service.connectionmanager/setipv4 '{
"method":"manual",
"address":"<Your IP address>",
"netmask":"<Your netmask>",
"gateway":"<Your gateway address>"
}'{"returnValue": true}# Set DNS Serverroot@raspberrypi4:/sysroot/home/root# luna-send -n 1 -f luna://com.webos.service.connectionmanager/setdns '{"dns":["<Your DNS server IP address>"]}'{"returnValue": true}
You can check the network information using the following command: