Command-Line Interface (CLI) of webOS Open Source Edition (OSE) provides a collection of commands used for creating, packaging, installing, and launching apps or services in the command line environment. CLI lets you develop and test apps or services without using any IDE.
Note The npm package name of the CLI has been changed (from @webosose/ares-cli to @webos-tools/cli) since v3.0.2 (March 4, 2024). See How to Install.
Key Features
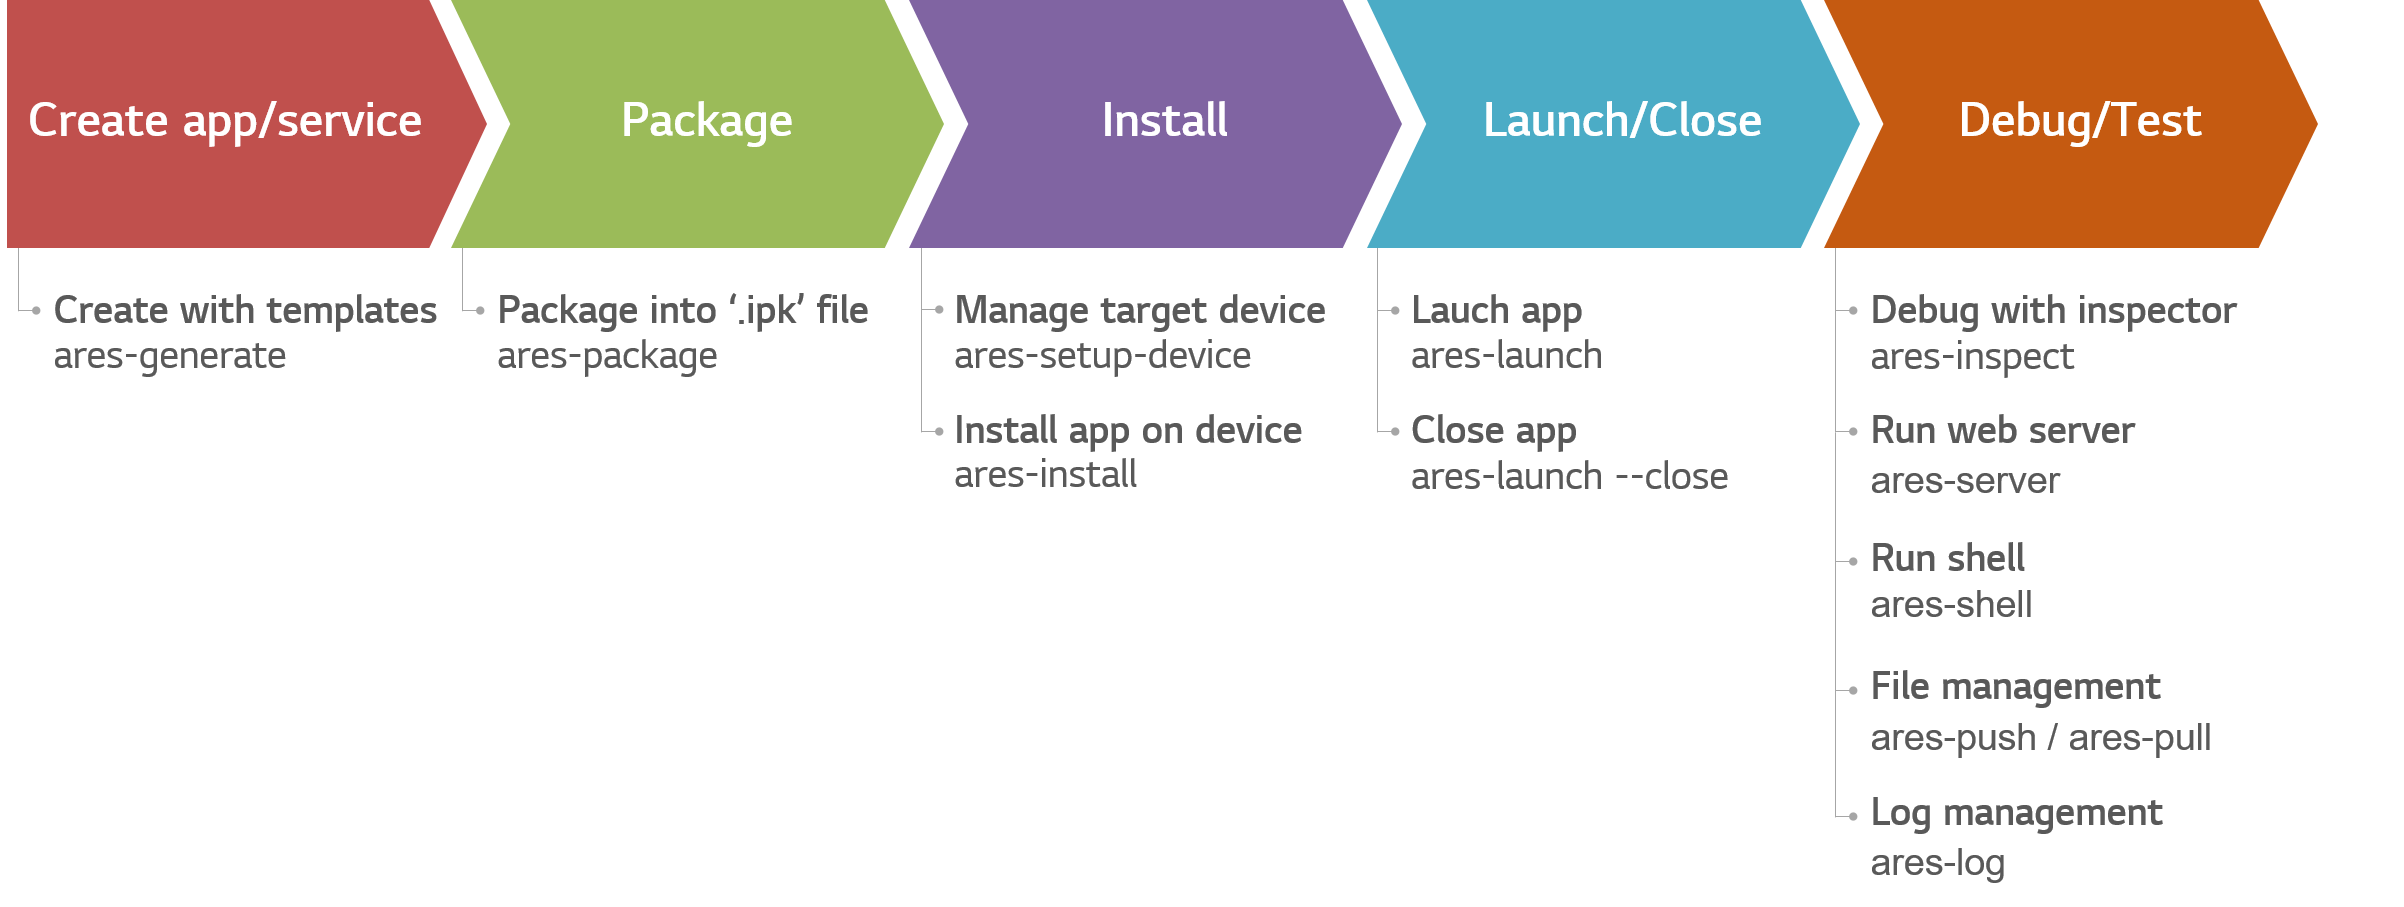
CLI provides necessary functionality throughout the entire web app development process, from app creation to debugging and testing. The following figure shows CLI commands that can be used during each stage of the development process.
Development Workflow with CLI
Creating Apps and Services
Provides standard templates for webOS OSE apps and services
Provides a list of available templates
Generates an app or a service and configures basic information
Packaging Apps and Services
Packages the source code and generates a package file (.ipk) to run on the target device
Provides a feature to exclude sample and test code directories from an app or a service
Managing Target Devices
Provides a list of target devices
Adds, modifies, and removes target devices
Installing Apps and Services
Installs the app and service on the target device
Provides a list of apps installed on the target device
Removes selected apps from the target device
Launching and Closing Apps
Launches selected apps
Closes apps that are running
Provides the list of apps running on the target device
Debugging/Testing Apps and Services
Enables Web Inspector for debugging web apps
Enables Node’s Inspector for debugging JavaScript services
Provides web app information
Provides JavaScript service information
Shows or saves logs of webOS OSE apps and services
Providing Target Device Information
Provides system information
Provides screen capture
Supports monitoring device’s resource usage
System Requirements
Operating Systems
Required version for each operating system are as follows:
OS
Requirement
Linux
Ubuntu 20.04 LTS 64-bit
macOS
Mac OS X 10.13 High Sierra or higher
Windows
Windows 10 64-bit
Software Tools
Node.js (Use v14.15.1 to v16.20.2)
npm
How to Install
CLI can be installed using Node Package Manager (npm).
Step 01. Installing npm
Before installing the CLI, ensure that Node.js and npm are installed on your system. If they are not installed, refer to the following instructions.
Run the installer and follow the installation instructions.
When finished, verify the installation by checking its version.
node -v
npm
The npm is included with the Node.js, so if you have successfully installed Node.js, you already have npm available for use.
Execute the following command to verify if the npm is available on your system.
npm -v
Step 02. Installing CLI
Caution
If the CLI is already installed globally, we highly recommend uninstalling the previous CLI globally.
# Uninstall the CLI globally$ npm uninstall -g @webosose/ares-cli
# Verify whether uninstalled the previous CLI$ ares --version
ares: command not found
Execute the following command in a terminal, using the -g option to install the CLI globally. For Linux and macOS users, the sudo privilege might be required.
npm install -g @webos-tools/cli
Verify the installation by checking its version. Check if the version matches with the latest version of CLI npm package.
ares --version
Step 03. Setting Up the OSE Profile
CLI supports multi-webOS platforms since v3.0.2 (default profile: tv). To use the CLI on webOS OSE, you MUST change your profile to ose.
To set up the profile, enter the following command:
$ ares-config --profile ose
How to Use
With the CLI, you can develop various types of downloadable apps or services. For detailed instructions, refer to the each tutorial.
COMMAND is entered using postfix of the ares commands. For more details, see Examples.
-h, --help
None
Prints help messages.
-V, --version
None
Prints the version of CLI.
-v
None
Prints verbose output.
--level
LEVEL
Sets the level of logs as LEVEL and prints the logs.
Parameters
Parameter
Description
LEVEL
A priority of logs (e.g., silly, verbose, info, warn, error)
Examples
Here are some examples of the different uses:
Listing all the ares commands
ares -l
Displaying the help menu for the ares-install command.
ares --install
ares-generate
This command creates a webOS OSE app or service from a template. ares-generate displays a list of available templates for a web app, JS services, and webOS OSE configuration files.
History
Version
Changes
v2.3.1
Supports the --level option.
v2.1.0
Updates requiresPermissions in the appinfo.json file.
Caution Template files generated by CLI v2.0.3 or older are not compatible with webOS OSE 2.10.0 or higher.
This command packages an app or a JS service into a package file (.ipk) which is stored in a specified directory. This command also analyzes the package file.
History
Version
Changes
v2.3.1
Supports the --info, --info-detail, and --level options.
Checks whether the appinfo.json file exists or not.
If the appinfo.json file does not exist, warning messages appear. This option does not make the package file.
-o, --outdir
OUT_DIR
Specifies a directory where the package file is created.
-e, --app-exclude
EX_DIR
Excludes directories or files when you package the source code. For more details on how to use this option, see Examples.
-r, --rom
None
Previews a directory hierarchy of an app when the app is installed.
This option creates a usr directory in the current directory rather than an .ipk file. The hierarchy of the usr directory is the same as the hierarchy when the .ipk file is actually installed on the target device.
--info
PACKAGE_FILE
Analyzes the package.
This option cannot be used in conjunction with other options.
--info-detail
PACKAGE_FILE
Analyzes the package with more details.
This option cannot be used in conjunction with other options.
-h, --help
None
Prints help messages.
-V, --version
None
Prints the version of CLI.
-v
None
Prints verbose output.
--level
LEVEL
Sets the level of logs as LEVEL and prints the logs.
Parameters
Parameter
Description
APP_DIR
The directory where the app's appinfo.json file is located
SERVICE_DIR
The directory where the service's services.json file is located
OUT_DIR
The directory where the package file (.ipk) is to be created
If this parameter is not specified, the package file is created in the current directory.
EX_DIR
A directory or file to be excluded from the package file (.ipk)
You can use common pattern expression such as wildcard (*).
PACKAGE_FILE
A webOS package file (.ipk)
This package file must be packaged with CLI beforehand.
LEVEL
A priority of logs (e.g., silly, verbose, info, warn, error)
Examples
Here are some examples of the different uses:
Creating a package file from the ./sampleApp directory and outputting it in the working directory
ares-package sampleApp
Creating a package file from the ./sampleApp directory and outputting it in the ./output directory
ares-package -o output sampleApp
Creating a package file except for the testCode1 directory (includes its subdirectories), README.md, and all .txt files
This command displays a list of registered target devices. You can add, modify, or remove them from the list. This command is mainly used to modify target’s host address which is running on a remote host. Without any option, this command runs in the interactive mode.
History
Version
Changes
v3.1.0
Updates rules for the DEVICE_INFO parameter.
v2.3.1
Supports the --level option.
v2.2.0
Updates a naming rule for the DEVICE_NAME parameter.
Adds a target device with the specified information. For more details, see Examples.
-m, --modify
TARGET_NAME
Modifies target device's information except a target device's name. For more details, see Examples.
-i, --info
DEVICE_INFO
Sets information for the target device. For more details on DEVICE_INFO, see Parameters.
-r, --remove
TARGET_NAME
Deletes a registered target device.
-f, --default
TARGET_NAME
Sets a default target device. If you don't set a target device, the default target device is used as the target device.
-R, --reset
None
Initializes the list of registered target devices.
-l, --list
None
Lists registered target devices.
-F, --listfull
None
Lists registered target devices' information with more details in the JSON format.
-h, --help
None
Prints help messages.
-V, --version
None
Prints the version of CLI.
-v
None
Prints verbose output.
--level
LEVEL
Sets the level of logs as LEVEL and prints the logs.
Parameters
Parameter
Description
DEVICE_INFO
Information of the target device in the format of "key=value" or a JSON-type string: "{'key1':'value1', 'key2':'value2', ...}". For more details, see Examples.
The available keys are as follows:
name: Target device's name
The target device name should not start with '%' or '$'.
description: Target device's description
host: Target device's host address
You can use localhost as the host.
port: Target device's port number
The port number must be between 1 and 65535.
username: Username for accessing the target device
root (default) – To be used by internal users only.
password: Password for authenticating the root user
By default the password for root user is blank.
If the password was previously set for a root user, then enter it here.
privatekey: Filename of SSH private key
Not applicable to the root user.
For the device, do not enter anything, leave it blank. The value will be auto-generated by using the passphrase provided by the user.
passphrase: Passphrase for using the SSH private key file
default: Setting a default device
Enter true to set a default device. Default value is false.
This key must be used with --add option.
When using CLI in interactive mode, take care when entering the required values or choosing to use the default values, otherwise you might not be able to use the device.
TARGET_NAME
The name of a target device
LEVEL
A priority of logs (e.g., silly, verbose, info, warn, error)
Examples
Here are some examples of the different uses:
Listing target devices
ares-setup-device --list

name               deviceinfo               connection  profile
------------------ ------------------------ ----------- -------
emulator (default) developer@127.0.0.1:6622 ssh         ose
Adding a target device with interactive mode (target device name: target, host address: 10.123.45.67, port number: 22, user: root)
ares-setup-device
name deviceinfo connection profile
------------------ ------------------------ ----------- -------
emulator (default) developer@127.0.0.1:6622 ssh ose
** You can modify the device info in the above list, or add a new device.
? Select: add
? Enter Device Name: target
? Enter Device IP address: 10.123.45.67
? Enter Device Port: 22? Enter ssh user: root
? Enter description: sample
? Select authentication: password
? Enter password: [hidden]? Set default? Yes
? Save? Yes
name deviceinfo connection profile
------------------ ------------------------ ---------- -------
target (default) root@10.123.45.67:22 ssh ose
emulator developer@127.0.0.1:6622 ssh ose
Note If you want to use the default values or an empty value, press the Enter key without any input.
Modifying a target device (target device name: target, port number: 9922)
ares-setup-device --modify target -i "port=9922"
Modifying a target device with interactive mode (target device name: target, port number: 9922)
ares-setup-device
name deviceinfo connection profile
------------------ ------------------------ ---------- -------
target (default) root@10.123.45.67:22 ssh ose
emulator developer@127.0.0.1:6622 ssh ose
** You can modify the device info in the above list, or add a new device.
? Select: modify
? Enter Device Name: target
? Enter Device IP address: 10.123.45.67
? Enter Device Port: 9922? Enter ssh user: root
? Enter description: sample
? Select authentication: password
? Enter password: [hidden]? Save? Yes
name deviceinfo connection profile
---------------- ------------------------ ---------- -------
target (default) root@10.123.45.67:9922 ssh ose
emulator developer@127.0.0.1:6622 ssh ose
Note If you want to use the preset values, press the Enter key without any input.
Setting a target device as the default device
ares-setup-device --default target
Removing a target device
ares-setup-device --remove target
ares-install
This command installs an packaged app on the target device. You can also check the list of installed apps or remove them with this command.
This command launches or terminates the application installed on the target device. This command can also display the list of applications running on the target device.
If this option is not specified, the default target device is connected.
-D, --device-list
None
Lists all the target devices.
--close
APP_ID
Terminates an application on the target device.
-r, --running
None
Lists applications that are running on the target device.
-dp, --display
DISPLAY_ID
Launches an application on a specified display.
-p, --params
PARAMS
Launches an application with specified parameters. For more details, see PARAMS in Parameters and Examples.
-H, --hosted
APP_DIR
Runs an app without installing it.
This option launches a dummy app (ID: com.sdk.ares.hostedapp) on the target device. To close this app, use the --close option with com.sdk.ares.hostedapp as an app ID.
-h, --help
None
Prints help messages.
-V, --version
None
Prints the version of CLI.
-v
None
Prints verbose output.
--level
LEVEL
Sets the level of logs as LEVEL and prints the logs.
Parameters
Parameter
Description
APP_ID
The ID of an app (ex. com.webos.exampleapp)
APP_DIR
An app directory to preview
DISPLAY_ID
The ID of a display to launch
It should be an integer type. (Use 0 for the primary display and 1 for the secondary display.)
TARGET_DEVICE
The name of a target device
PARAMS
Parameters which are used on application launching
This parameters should be a JSON-type string: "{'param1':'value1', 'param2':'value2 which contains spaces', ...}". See also params in the launch method.
LEVEL
A priority of logs (e.g., silly, verbose, info, warn, error)
Examples
Here are some examples of the different uses:
Launching the application installed on the target device
Note When you use parameters on a web app, the web app will receive the parameters through the webOSLaunch event. For more detailed information on the webOSLaunch event, see Web App Lifecycle.
This command enables Web Inspector or Node’s Inspector. Each inspector displays the run-time information of a web application or a JS service, respectively.
Caution
We highly recommend you to use the same version as Chrome/Chromium of webOS OSE. Using other versions might cause unexpected errors.
To check the Chromium version of your target device, do one of the following:
Execute the ares-device -i command. In this case, make sure username of the target device is set as root. Otherwise the Chromium version won’t be displayed. For more details on how to set up the username, see DEVICE_INFO of ares-setup-device.
Specifies the application to debug with Web Inspector.
-s, --service
SERVICE_ID
Specifies the JS service to debug with Node's Inspector.
-o, --open
None
Opens the default browser of the host machine. This option is only available for Web Inspector, thus can be used with the -a, --app option only.
Web Inspector works in the Blink-based web browsers (e.g., Chrome or Opera) only. If your default browser is not the Blink-based browsers, such as Safari or Internet Explorer, you must re-open the inspector page in the Blink-based browsers.
Note To connect to Node’s Inspector, you should use one of the Node’s Inspector clients, such as Chrome DevTools or Visual Studio Code. For more information, see Inspector Clients.
-d, --device
TARGET_DEVICE
Specifies a target device to connect.
If this option is not specified, the default target device is connected.
-D, --device-list
None
Lists all the target devices.
-dp, --display
DISPLAY_ID
Launches an application and opens Web Inspector on a specified display.
-h, --help
None
Prints help messages.
-V, --version
None
Prints the version of CLI.
-v
None
Prints verbose output.
--level
LEVEL
Sets the level of logs as LEVEL and prints the logs.
Parameters
Parameter
Description
APP_ID
The ID of an app (ex. com.webos.exampleapp)
SERVICE_ID
The ID of a JS service (ex. com.webos.exampleapp.service)
TARGET_DEVICE
The name of a target device
LEVEL
A priority of logs (e.g., silly, verbose, info, warn, error)
This command runs a web server for testing local files. The web server will run on the given path. You can terminate the web server by pressing Control+C on the shell prompt.
This command shows, filters, and saves logs collected by journald.
Note To display logs and help messages properly, you must set the logging daemon of CLI to same as that of the target device. For more details on how to check and change the logging daemon, see --current-daemon and --switch-daemon in Options.
Displaying stored logs from system.journal in the JSON format
ares-log -file system.journal -o json -d DEVICE
Displaying logs of the specified process ID and saving them to a log file
ares-log -pid 1735 -s pid_1735.log -d DEVICE
Displaying logs of the specified unit
ares-log -u sam -d DEVICE
ares-log (pmlog)
This command shows, filters, and saves logs collected by pmlogd.
Note To print logs and help messages properly, you must set the logging daemon of CLI to same as that of the target device. For more details on how to check and change the logging daemon, see --current-daemon and --switch-daemon in Options.