Note
If you want to add a service to your web app, see Developing External JS Services or Developing External Native Services.
If you want to add a service to your web app, see Developing External JS Services or Developing External Native Services.
External web apps are 3rd party web apps that must be installed on the webOS target device. External web apps can be created and deployed using the Command-Line Interface (CLI) tool that are provided by the webOS Open Source Edition (OSE) SDK.
This page describes the steps to develop an external web app using CLI. For detailed information on the commands used in this tutorial, see CLI commands.
Developing an external web app requires the following steps:
Start by creating a web app using one of the available web app templates. These templates provide a starting point for developing the web app.
To create a basic web app, execute the following command:
$ ares-generate -t webapp sampleApp
In the above command:
webapp is the name of template that creates a basic web app.sampleApp is the web app directory which is created in the current directory.The following shows an example directory structure of the sample app.
sampleApp/
├── appinfo.json
├── icon.png
└── index.html
The web app directory (sampleApp) has the following files:
File | Description |
|---|---|
appinfo.json | Configuration file that includes metadata for the web app. |
icon.png | The icon image file. Can be replaced with a relevant icon. |
index.html | Web application main page. This page only shows "Hello, Web Application!!" text on the screen. |
If you already have an existing web app that you want to deploy on a webOS OSE device, you must add the appinfo.json file to the app root directory. To create this file, enter the following CLI command:
$ ares-generate -t webappinfo webApp
Design and implement the source code for the web app.
By default, the webapp web app template includes some basic code that prints a “Hello, Web Application!!” message. Therefore, if you want to create a demo web app to test this process, you can skip this step and proceed.
If you want to use a webOS service in the web app, check the information in the Implement the Web App section in Developing Built-in Web Apps.
The details or metadata of the web app must be specified in the appinfo.json file. This file is automatically created when you create a web app. For details, see appinfo.json.
CLI provides the appinfo.json file template as below.
| appinfo.json |
|---|
|
After implementing and configuring the web app, it must be packaged as an IPK file. Make sure the appinfo.json file is available, because it is required when packaging a web app for webOS OSE.
To package the web app, use the ares-package command. The IPK file is generated in the current directory.
General usage:
$ ares-package <APP_DIR> [<SERVICE_DIR>]
In the above command, <APP_DIR> and <SERVICE_DIR> mean app and service directories respectively. You can use an absolute or relative path for both <APP_DIR> and <SERVICE_DIR>. For details on using ares-package, see ares-package.
Sample usage:
ares-package sampleAppares-package ./sampleAppTo install the web app on the target device, execute the following command:
$ ares-install --device <TARGET_DEVICE> ./com.domain.app_1.0.0_all.ipk
In the above command:
<TARGET_DEVICE> is the name of the target device../com.domain.app_1.0.0_all.ipk is the name of the IPK file that is generated after packaging the app in the previous step.If the installation is successful, a Success message will appear.
To verify the installation, check if the web app ID (in this case, com.domain.app) is available in the output of the following command:
$ ares-install --device <TARGET_DEVICE> --list
To remove the app from the device, use the ares-install command as follows:
$ ares-install --device <TARGET_DEVICE> --remove com.domain.app
To launch the web app on the target device, execute the following command:
$ ares-launch --device <TARGET_DEVICE> com.domain.app
In the above command:
<TARGET_DEVICE> is the name of the target device. This is the same device on which the app was installed in the previous step.com.domain.app is the app ID that is available after installing the app.After executing the above command, check the target device to see if the app is running.
To close the app, use the ares-launch command as follows:
$ ares-launch --device <TARGET_DEVICE> --close com.domain.app
You can use the Web Inspector to debug web apps by monitoring the run-time status of the web app running on a target device. The Web Inspector allows you to control JavaScript execution, inspect the CSS and HTML code of the web pages, and monitor the usage of resources.
Web Inspector is based on Chrome DevTools. Refer to Google Developers for the detailed description of how to use Chrome DevTools. Note that older versions of Google Chrome may not support Web Inspector.
To launch the Web Inspector on a webOS OSE device, execute the ares-inspect command while the web app is running. For detailed information on the command, see ares-inspect.
General Usage:
$ ares-inspect --device <TARGET_DEVICE> --app <APP_ID> --open
This loads the Web Inspector in your default browser as shown in the following screenshot:
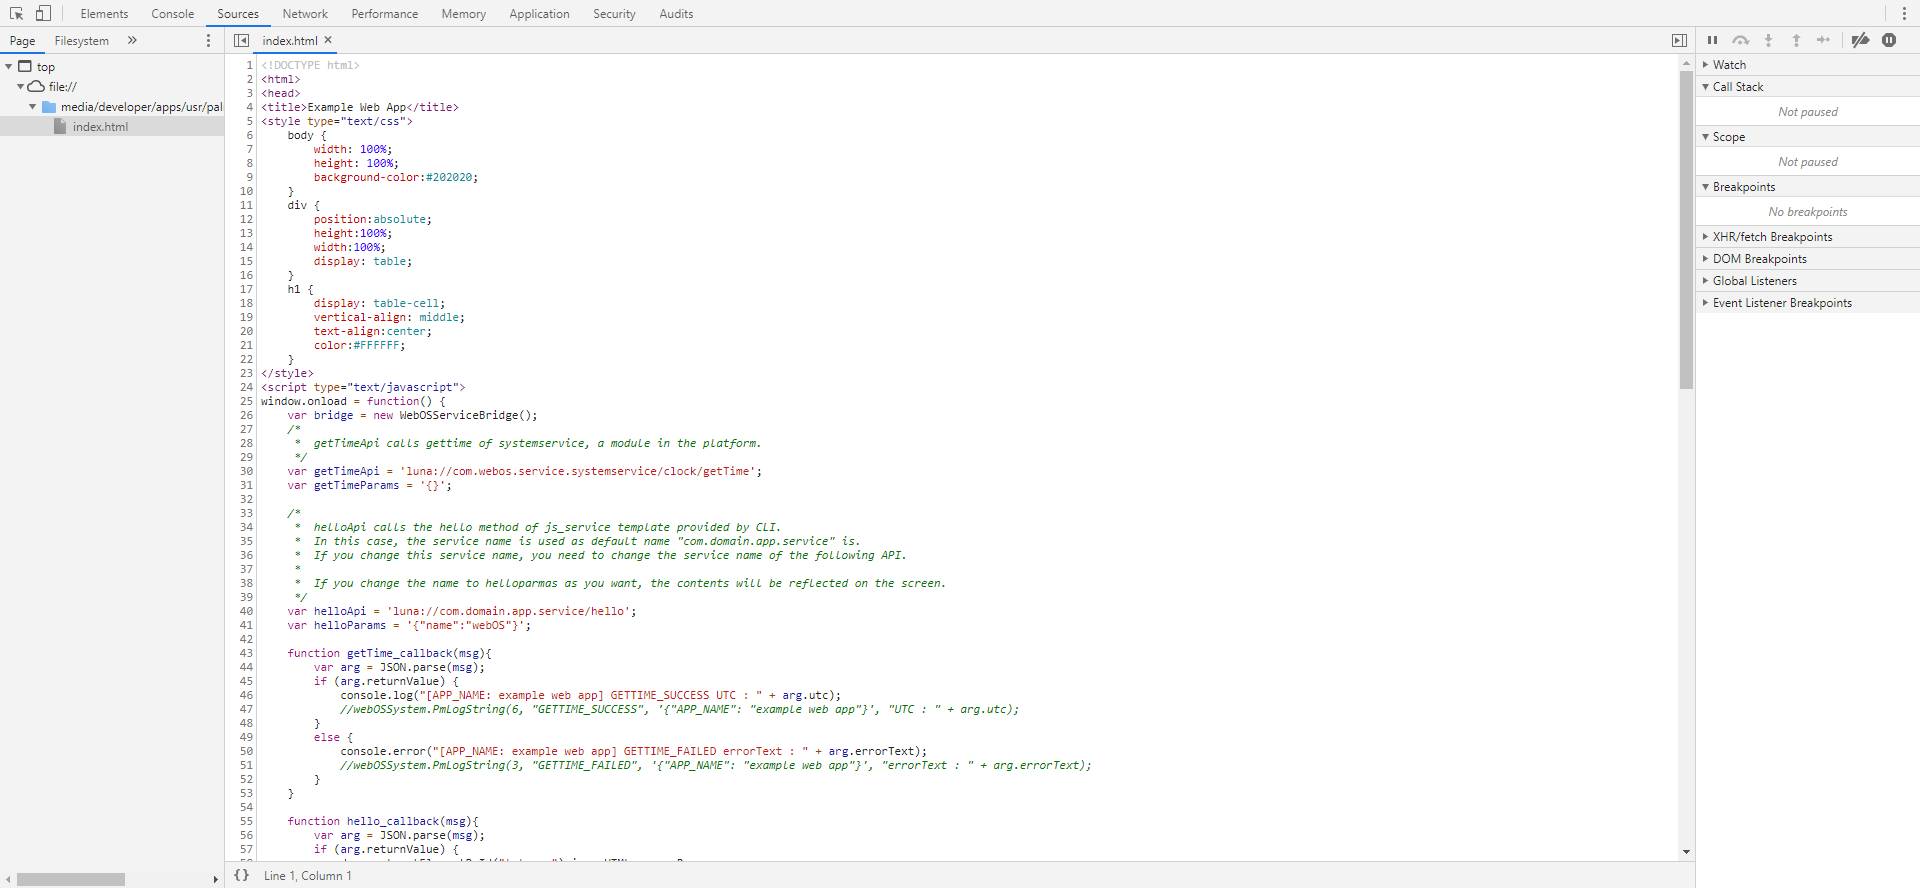
Web Inspector screenshot
The ares-server command can run a web server based on a given app directory. A web browser has some restrictions related to security policy, on accessing local files (same-origin policy). For this reason, this command provides a simple web server to bypass the security policy of browsers. For detailed information on the command, see ares-server.
To start the web server on your app directory, execute the following command:
$ ares-server ./sampleApp

Local server running on http://localhost:7496
This command starts the web server and gives a URL which you can use to open the app. Alternatively, if you want the command to directly open the URL on the default browser, execute the following command:
$ ares-server ./sampleApp --open
Contents